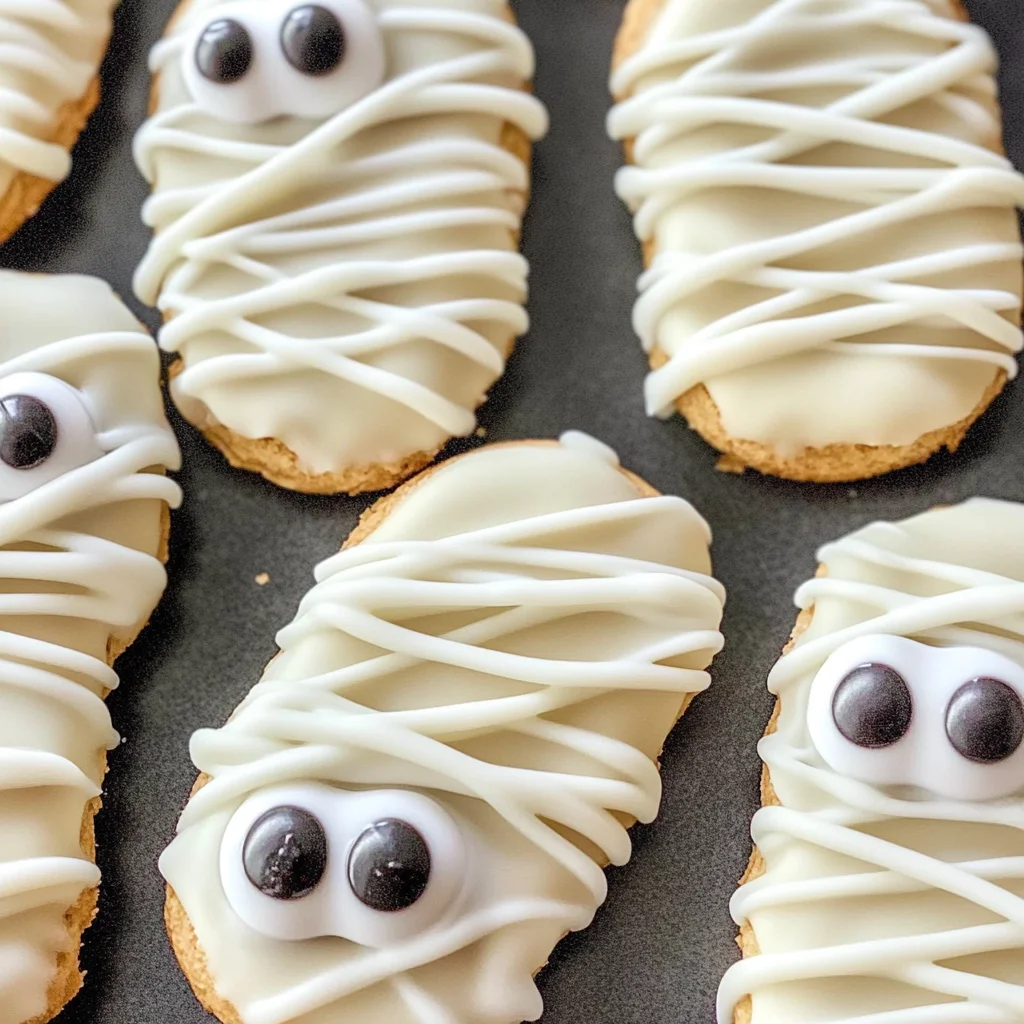
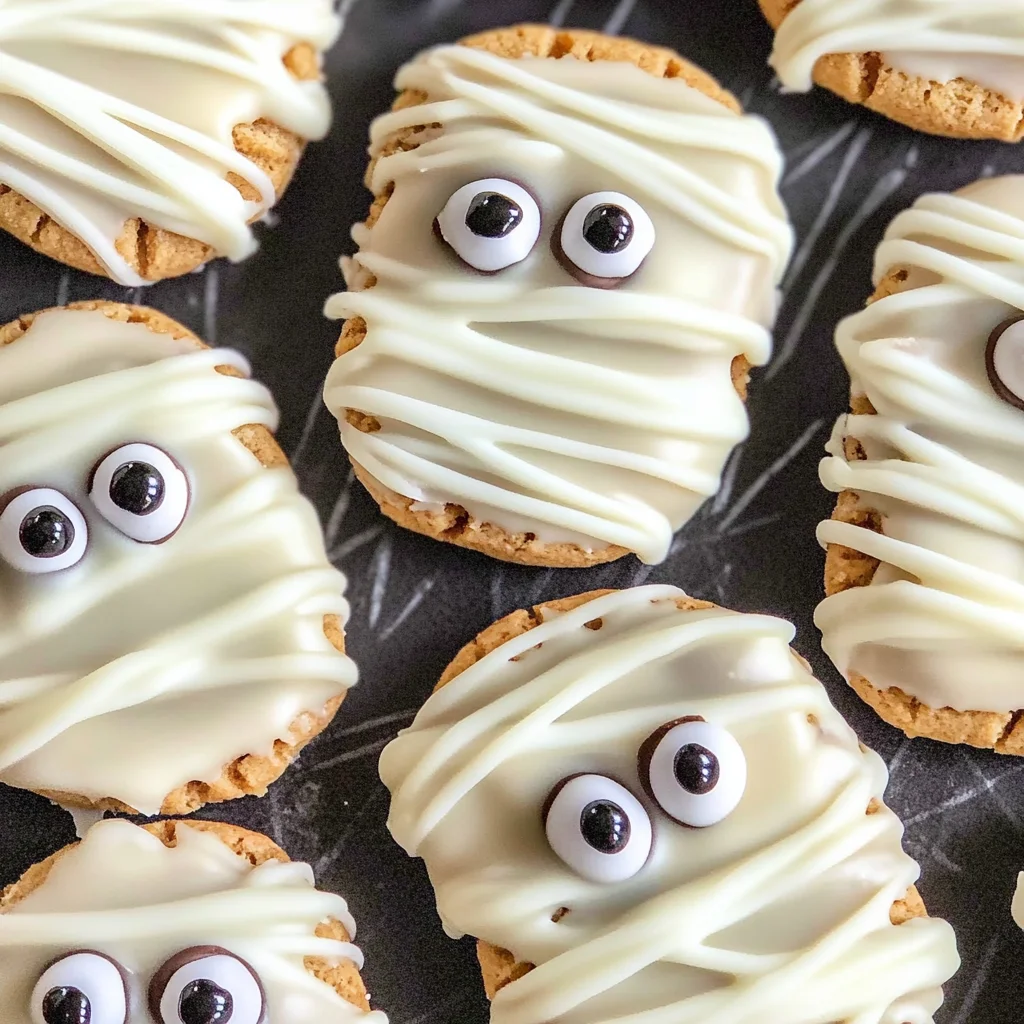
Nutter Butter Mummies
If you’re looking for a fun and delightful treat that’s perfect for Halloween or any festive gathering, you’ve landed in the right spot! These Nutter Butter Mummies are not only adorable but also super easy to whip up. They bring a smile to both kids and adults alike, making them a favorite in our home. Whether you’re planning a family movie night or a spooky party, these little mummies will surely steal the show!
What I love most about this recipe is how simple it is. You can get the kids involved in decorating their own mummies, turning baking into a fun family activity. Plus, they make for an impressive dessert that doesn’t require hours in the kitchen!
Why You’ll Love This Recipe
- Quick and Easy: With just four ingredients, you’ll have these Nutter Butter Mummies ready in no time!
- Family-Friendly Fun: Kids will love helping with the decorating—it’s the perfect way to bond over baking.
- Versatile Treats: These mummies can be enjoyed as snacks or desserts at various occasions.
- Make-Ahead Option: Prepare these treats ahead of time and store them until your event—so convenient!
Ingredients You’ll Need
Gathering your ingredients is half the fun! This recipe uses simple, wholesome ingredients that you probably already have in your pantry. Here’s what you need to create these delightful Nutter Butter Mummies:
For the Mummies:
- 8 Nutter Butter Cookies
- 1 (12 oz) bag White Chocolate Chips
- 16 Candy Eyes
Variations
This recipe is quite flexible, allowing you to get creative with your mummies! Here are a few fun ideas to switch things up:
- Swap the Chocolate: Use dark chocolate instead of white for a richer flavor.
- Add Sprinkles: Decorate your mummies with colorful sprinkles for an extra festive touch!
- Use Different Cookies: Try this with other cookie shapes for unique mummy designs.
- Make it Crunchy: Add crushed nuts or crispy rice cereal on top of the melted chocolate for added texture.
How to Make Nutter Butter Mummies
Step 1: Prepare Your Workspace
Start by laying out parchment paper on your countertop. This will keep your workspace clean and provide a nice surface for your mummies to cool on. It’s important because nobody wants a sticky mess when they’re trying to enjoy some spooky treats!
Step 2: Melt the Chocolate
In a small microwave-safe bowl, melt the white chocolate chips according to package instructions. Stirring every 30 seconds ensures it melts evenly without burning. This melted chocolate will coat our Nutter Butter cookies beautifully!
Step 3: Coat the Cookies
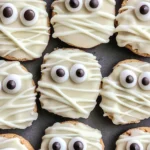
Dip one Nutter Butter cookie into the melted chocolate, making sure it’s fully coated. Tap off any excess chocolate gently against the side of the bowl—this helps prevent drips later on. Place it on the parchment paper and add two candy eyes before the chocolate hardens; this step is crucial for creating that adorable mummy look!
Step 4: Add Mummy Wrappings
Once all your cookies are coated and decorated with eyes, melt any remaining chocolate again. Drizzle it over each hardened cookie in random patterns to give them that classic mummy wrap appearance. This adds character and enhances their spooky charm!
And there you have it! Your deliciously cute Nutter Butter Mummies are ready to impress everyone at your next gathering. Enjoy every bite of these delightful treats!
Pro Tips for Making Nutter Butter Mummies
Making Nutter Butter Mummies is a fun and straightforward activity, and with a few handy tips, you can elevate your spooky treats to the next level!
- Use high-quality chocolate: The better the chocolate, the smoother and tastier your mummies will be. Quality chocolate melts more evenly and gives a luscious finish.
- Work quickly when dipping: Chocolate can harden fast, so it’s best to dip and decorate your cookies promptly. This ensures that the candy eyes adhere well before the chocolate sets.
- Drizzle with precision: For a more authentic mummy look, use a piping bag or a fork to drizzle melted chocolate over the hardened cookies. This creates nice, thin lines that mimic mummy bandages.
- Customize your decorations: Feel free to experiment with different types of candy eyes or even edible glitter for an extra magical touch. This makes your mummies unique and more festive.
- Store properly: Keep your mummies in an airtight container at room temperature to maintain their freshness. Avoid refrigerating them as this can cause the chocolate to bloom.
How to Serve Nutter Butter Mummies
Presenting your Nutter Butter Mummies in a fun way adds to their charm! Whether you’re hosting a Halloween party or just enjoying them at home, here are some delightful serving suggestions.
Garnishes
- Sprinkles: A light sprinkle of colorful Halloween-themed sprinkles adds a festive touch that kids (and adults!) will love.
- Chocolate shavings: Shaving some dark chocolate on top can create an elegant contrast against the white chocolate and enhance the flavor profile.
Side Dishes
- Fresh Fruit Platter: A vibrant assortment of seasonal fruits like apples, grapes, and clementines makes for a refreshing complement to the sweet mummies.
- Veggie Sticks with Hummus: Crunchy veggies like carrots and celery served with creamy hummus provide a healthy balance to the sweetness.
- Popcorn: Lightly salted or caramel popcorn is a fun snack that pairs well with dessert items, adding texture and variety.
- Cheese Cubes: A platter of mild cheese cubes offers savory bites that contrast nicely with the sweet flavors of the mummies.
With these serving ideas in mind, you’re ready to impress your guests with not just adorable treats but also delightful accompaniments! Enjoy making memories while crafting these spooky snacks!
Make Ahead and Storage
These Nutter Butter Mummies are not only fun to make, but they also work wonderfully for meal prep! You can whip them up in advance for a festive treat or a Halloween gathering.
Storing Leftovers
- Place any uneaten Nutter Butter Mummies in an airtight container.
- Store at room temperature for up to 3 days.
- For longer storage, refrigerate them, but keep in mind that the chocolate may lose some of its sheen.
Freezing
- If you want to make these ahead of time, wrap each mummy in plastic wrap before placing them in a freezer-safe bag.
- They can be frozen for up to 2 months.
- When you’re ready to enjoy them, simply thaw at room temperature for a couple of hours.
Reheating
- These treats are best served at room temperature, so there’s no need to reheat.
- If desired, you can leave them out for about 30 minutes before serving to soften slightly after being refrigerated or frozen.
FAQs
Got questions about making Nutter Butter Mummies? Here are some common ones!
Can I make Nutter Butter Mummies ahead of time?
Absolutely! These mummies can be made a day or two in advance and stored in an airtight container. They’re perfect for prepping before your Halloween festivities!
What if I don’t have white chocolate chips for Nutter Butter Mummies?
No worries! You can use any type of melting chocolate or candy coating you prefer. Just ensure it’s safe for your dietary needs.
How do I store leftover Nutter Butter Mummies?
Store any leftovers in an airtight container at room temperature for up to three days. For longer storage, you can refrigerate them.
Can I put Nutter Butter Mummies on popsicle sticks?
Yes! That’s a fun idea to create adorable mummy pops. Simply insert the stick into the cookie before dipping it into the chocolate!
Final Thoughts
I hope you’re as excited to make these adorable Nutter Butter Mummies as I am! They’re not just delicious but also bring a smile with their cute and spooky appearance. Whether you’re preparing for a party or just indulging yourself, these treats are sure to please. Enjoy creating and sharing these delightful mummies with your friends and family this Halloween season! Happy baking!
Nutter Butter Mummies
Create delightful Nutter Butter Mummies with this easy recipe—perfect for Halloween! Get ready to impress everyone with your tasty treats!
- Prep Time: 15 minutes
- Cook Time: 5 minutes
- Total Time: 20 minutes
- Yield: 8 servings 1x
- Category: Dessert
- Method: Baking
- Cuisine: American
Ingredients
- 8 Nutter Butter Cookies
- 1 (12 oz) bag White Chocolate Chips
- 16 Candy Eyes
Instructions
- Prepare your workspace by laying parchment paper on your counter.
- Melt the white chocolate chips in a microwave-safe bowl, stirring every 30 seconds until smooth.
- Dip each Nutter Butter cookie into the melted chocolate, ensuring it's fully coated. Tap off excess chocolate and place it on parchment paper. Add two candy eyes while the chocolate is still soft.
- Drizzle remaining melted chocolate over the cookies in random patterns to mimic mummy wrappings.
Nutrition
- Serving Size: 1 serving
- Calories: 145
- Sugar: 10g
- Sodium: 45mg
- Fat: 8g
- Saturated Fat: 4g
- Unsaturated Fat: 3g
- Trans Fat: 0g
- Carbohydrates: 17g
- Fiber: 0g
- Protein: 1g
- Cholesterol: 0mg