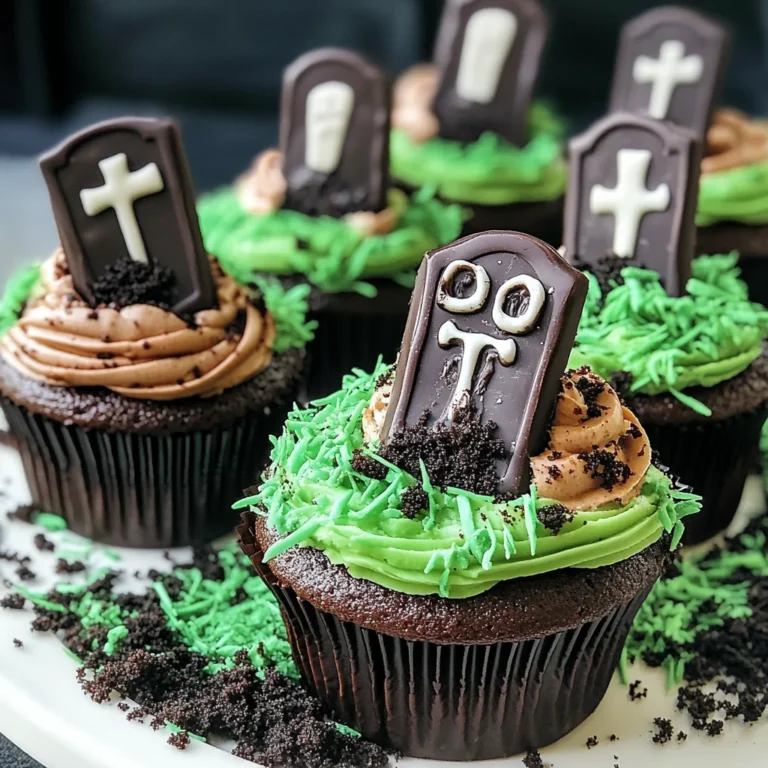
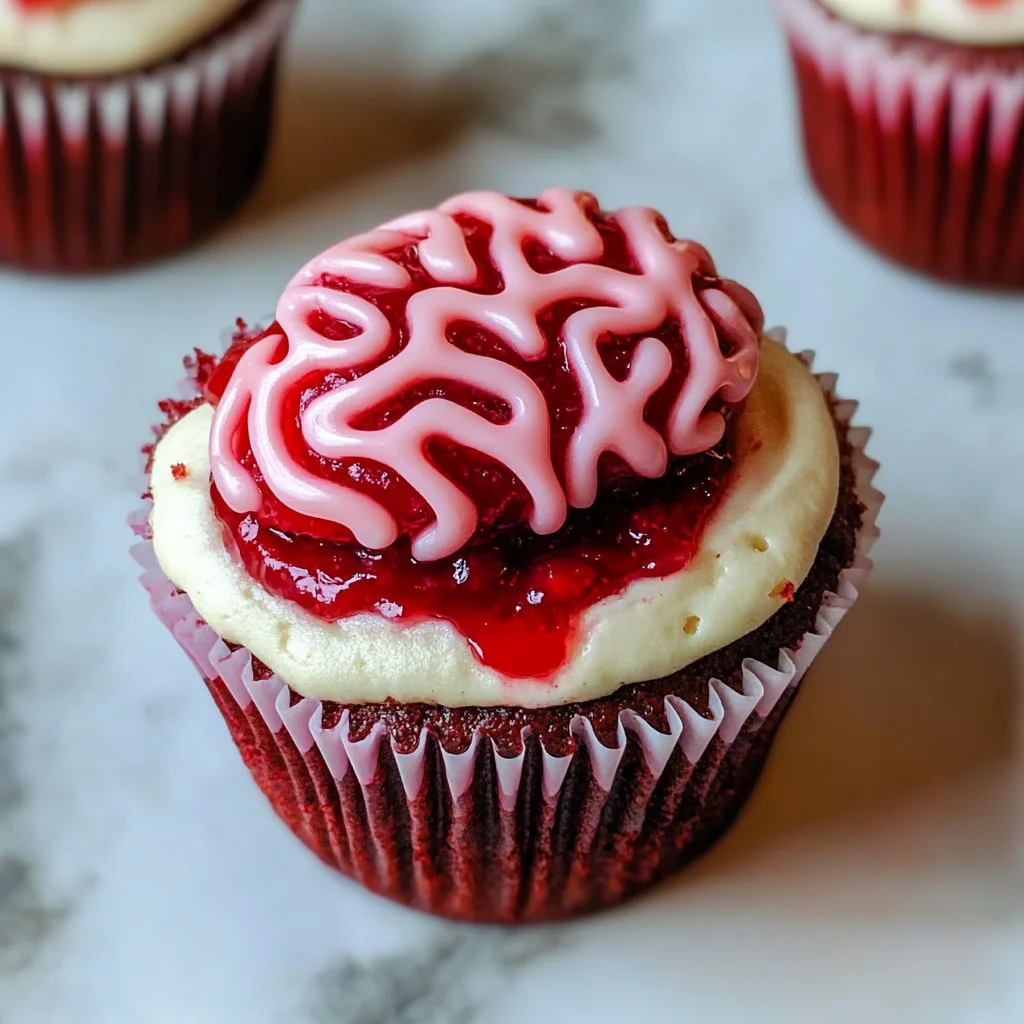
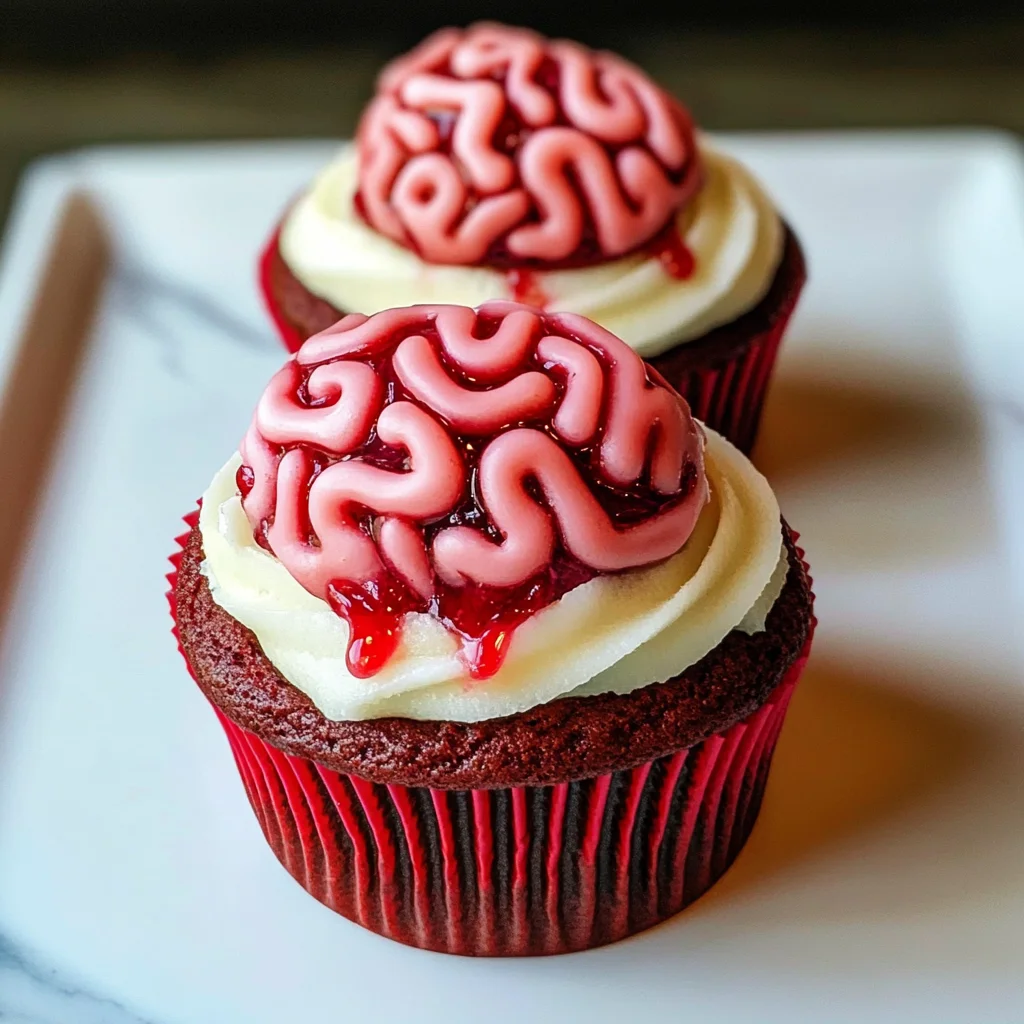
Bleeding Brain Cupcakes
If you’re looking for a show-stopping treat that will thrill your friends and family this Halloween, look no further than these Bleeding Brain Cupcakes! These delightful red velvet cupcakes are not only a feast for the eyes but also a tasty delight. With a jam-filled center and pink icing shaped like brains, they’re sure to bring some spooky fun to your celebrations. Whether you’re hosting a party or simply want to indulge in something sweet, these cupcakes are the perfect choice!
The best part? They’re simple enough to make on a busy afternoon but impressive enough to wow your guests at any gathering. So roll up your sleeves and let’s get baking!
Why You’ll Love This Recipe
- Spooky Fun: These cupcakes are perfect for Halloween-themed parties or any event where you want to add a playful twist.
- Deliciously Sweet: The combination of red velvet and sweet jam creates a delightful flavor that everyone will love.
- Easy to Make: With straightforward steps, even novice bakers can whip up these treats with confidence.
- Make Ahead: You can prepare the cupcakes in advance, making them an excellent option for busy schedules.
- Family-Friendly: Kids will have a blast helping decorate these creepy treats!
Ingredients You’ll Need
Making these Bleeding Brain Cupcakes is all about using simple, wholesome ingredients you likely already have at home. Here’s what you’ll need:
For the Cupcakes
- 150 g Butter or baking spread (softened, unsalted)
- 150 g Caster sugar
- 2 Eggs (large)
- 1 tsp Vanilla extract
- 85 ml Buttermilk
- 165 g Self raising flour
- 1 1/2 tbsp Cocoa powder
- 1/2 tsp Bicarbonate of soda
- 1 tsp Red food colouring (I use Pro Gel or Sugarflair)
- 200 g Strawberry or Raspberry Jam
For the Icing
- 200 g Butter (unsalted, softened)
- 400 g Icing sugar
- 1 tsp Vanilla extract
- 2 tbsp Milk
- Pink food colouring (I use Pro Gel or Sugarflair)
Variations
This recipe is wonderfully flexible! Feel free to mix things up and make it your own with these fun variations:
- Change the Flavor: Swap out the strawberry or raspberry jam for other fruity jams like blueberry or cherry for a unique twist.
- Different Colors: Use different food colorings to create vibrant designs that suit any theme beyond Halloween!
- Cupcake Size: Want mini cupcakes? Simply adjust baking time and enjoy bite-sized treats.
- Add Sprinkles: Top your icing with colorful sprinkles for an added touch of festivity!
How to Make Bleeding Brain Cupcakes
Step 1: Preheat Your Oven
Start by pre-heating your oven to 160C Fan/180C/350F/Gas Mark 4. This is crucial because it ensures that your cupcakes bake evenly and rise perfectly.
Step 2: Mix Butter and Sugar
In a mixing bowl, whisk together the softened butter and caster sugar until fluffy. Using an electric mixer makes this much easier! This step adds air into the mixture, resulting in light and airy cupcakes.
Step 3: Add Eggs and Vanilla
Next, incorporate the eggs and vanilla extract into your buttery mixture. Mix until well combined. The eggs help bind everything together while adding richness.
Step 4: Combine Dry Ingredients
Add in the buttermilk, cocoa powder, bicarbonate of soda, red food coloring, and self-raising flour. Gently mix until just combined—overmixing can lead to dense cupcakes.
Step 5: Fill Your Cases
Carefully divide the batter among your lined cupcake cases. Aim for about two-thirds full so they have room to rise without overflowing.
Step 6: Bake Them Up
Bake in your preheated oven for 20-25 minutes. You’ll know they’re done when a skewer inserted in the center comes out clean. Once baked, place them on a cooling rack to cool completely.
Step 7: Create the Jam Center
Once cooled, use a cupcake corer or knife to make holes in the centers of each cupcake. Fill each hole generously with jam—this is where the bleeding effect comes from!
Step 8: Make the Icing
To prepare your buttercream icing, mix softened butter on its own for a few minutes until creamy. Then add icing sugar, milk, vanilla extract, and just a touch of pink food coloring until smooth—remember not to overdo it on color!
Step 9: Decorate Your Cupcakes
Transfer your beautiful pink icing into a piping bag fitted with a round nozzle. Pipe along the center of each cupcake first then create squiggles on either side—this gives it that fun brain effect!
Step 10: Store Properly
Keep any leftovers in an airtight container in a cool place; they’re best enjoyed within three days.
Enjoy making these Bleeding Brain Cupcakes! They’re sure to become a favorite every Halloween season!
Pro Tips for Making Bleeding Brain Cupcakes
Creating the perfect Bleeding Brain Cupcakes can be a fun and rewarding experience! Here are some tips to ensure your spooky treats turn out just right.
- Use room temperature ingredients: Bringing your butter and eggs to room temperature before mixing helps create a smoother batter, resulting in fluffier cupcakes.
- Don’t overmix the batter: Mixing just until combined prevents developing too much gluten, which keeps your cupcakes light and tender.
- Test for doneness: Insert a skewer into the center of a cupcake; if it comes out clean, they are ready. This ensures you won’t risk dry cupcakes!
- Piping technique matters: Practice piping the buttercream on a piece of parchment paper before decorating your cupcakes. This helps you achieve that perfect brain squiggle effect!
- Adjust color gradually: When adding food coloring to buttercream, start with a tiny amount. You can always add more to reach your desired shade without going overboard.
How to Serve Bleeding Brain Cupcakes
Presentation is key when serving these festive cupcakes! They can be made extra special with a few thoughtful touches that will wow your guests.
Garnishes
- Edible glitter: A sprinkle of edible glitter can give your cupcakes an otherworldly shimmer that catches the eye.
- Gummy worms: Placing a gummy worm on top of each cupcake adds an unexpected and playful element that perfectly matches the Halloween theme.
Side Dishes
- Pumpkin soup: A warm bowl of creamy pumpkin soup complements the sweetness of the cupcakes while keeping with the fall theme.
- Spooky fruit skewers: Assemble skewers with seasonal fruits like grapes, strawberries, and melon balls for a refreshing counterbalance to the rich flavors.
- Salad with cranberries: A mixed green salad topped with dried cranberries offers a tangy contrast and adds a burst of color to your dessert spread.
With these serving suggestions, you’re sure to create an unforgettable Halloween treat table! Enjoy crafting these deliciously eerie Bleeding Brain Cupcakes—they’re bound to be the highlight of any spooky gathering. Happy baking!
Make Ahead and Storage
These Bleeding Brain Cupcakes are not only a fun treat for Halloween, but they’re also great for meal prep! You can make them in advance and store them properly to enjoy throughout the week.
Storing Leftovers
- Store cupcakes in an airtight container to keep them fresh.
- Place them in a cool, dry area away from direct sunlight.
- Enjoy leftovers within 3 days for the best taste and texture.
Freezing
- To freeze, place fully cooled cupcakes in a single layer in an airtight container or freezer bag.
- You can also freeze the buttercream separately if you prefer.
- They can be stored for up to 1 month. Just remember to label your containers!
Reheating
- If you want to enjoy your frozen cupcakes warm, let them thaw overnight in the fridge first.
- You can then microwave them for about 10-15 seconds for a freshly baked feel.
- For buttercream, let it come to room temperature before using it.
FAQs
Here are some common questions about making Bleeding Brain Cupcakes:
Can I use a different flavor of jam in my Bleeding Brain Cupcakes?
Absolutely! While strawberry or raspberry jam gives that perfect bleeding effect, feel free to use any fruit jam you love. Just keep in mind that it may change the final look a bit!
How do I get my cupcakes to rise perfectly when making Bleeding Brain Cupcakes?
Make sure your baking powder is fresh and that you’re not overmixing the batter. Mixing just until combined will help keep your cupcakes light and fluffy.
What should I do if my buttercream is too stiff while making Bleeding Brain Cupcakes?
If your buttercream turns out too stiff, simply add a teaspoon of milk at a time until you reach your desired consistency. This will help you achieve that smooth finish for piping.
Can I decorate my Bleeding Brain Cupcakes differently?
Of course! Get creative with decorations—sprinkles, edible glitter, or even gummy worms can give your cupcakes a unique twist!
Final Thoughts
I truly hope you enjoy making these spooky yet delicious Bleeding Brain Cupcakes! They’re perfect for Halloween parties, gatherings with friends, or just to indulge yourself with something fun. Remember, baking is about enjoying the process as much as the outcome—so have fun and don’t stress! I’d love to hear how yours turn out!
Bleeding Brain Cupcakes

Get ready to create a Halloween masterpiece with these Bleeding Brain Cupcakes! These eye-catching red velvet treats not only look delightfully spooky but also boast a deliciously sweet jam-filled center. Topped with creamy pink icing shaped like brains, they are the perfect addition to any Halloween celebration. Simple enough for novice bakers yet impressive enough to wow your friends and family, these cupcakes are a fun culinary project that everyone will enjoy. Whether you’re hosting a party or just indulging your sweet tooth, these cupcakes will surely be the star of the show!
- Prep Time: 20 minutes
- Cook Time: 25 minutes
- Total Time: 45 minutes
- Yield: Approximately 12 cupcakes 1x
- Category: Dessert
- Method: Baking
- Cuisine: Halloween
Ingredients
- 150 g softened butter
- 150 g caster sugar
- 2 large eggs
- 1 tsp vanilla extract
- 85 ml buttermilk
- 165 g self-raising flour
- 1½ tbsp cocoa powder
- 1 tsp red food coloring
- 200 g strawberry or raspberry jam
- 200 g softened butter (for icing)
- 400 g icing sugar
- 2 tbsp milk
- pink food coloring
Instructions
- Preheat your oven to 160C Fan/180C/350F/Gas Mark 4.
- In a mixing bowl, whisk together the softened butter and caster sugar until fluffy.
- Add the eggs and vanilla extract; mix until well combined.
- Gradually incorporate buttermilk, cocoa powder, red food coloring, and self-raising flour. Mix gently until just combined.
- Divide the batter among lined cupcake cases (about two-thirds full).
- Bake for 20–25 minutes; cool completely on a rack.
- Core each cupcake and fill with jam.
- For icing, mix butter until creamy; add icing sugar, milk, and pink food coloring until smooth. Pipe onto cupcakes in a brain-like design.
Nutrition
- Serving Size: 1 serving
- Calories: 250
- Sugar: 22g
- Sodium: 160mg
- Fat: 10g
- Saturated Fat: 6g
- Unsaturated Fat: 4g
- Trans Fat: 0g
- Carbohydrates: 38g
- Fiber: 1g
- Protein: 3g
- Cholesterol: 45mg