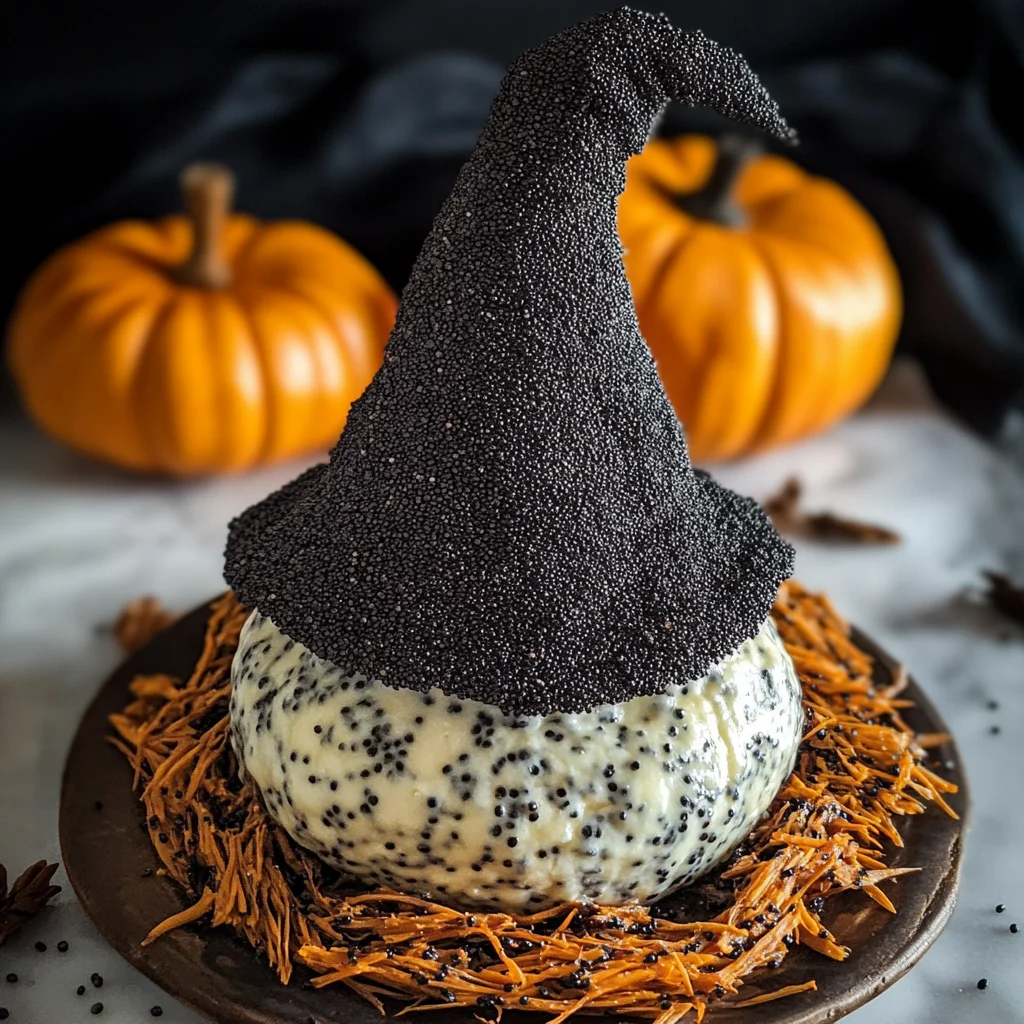
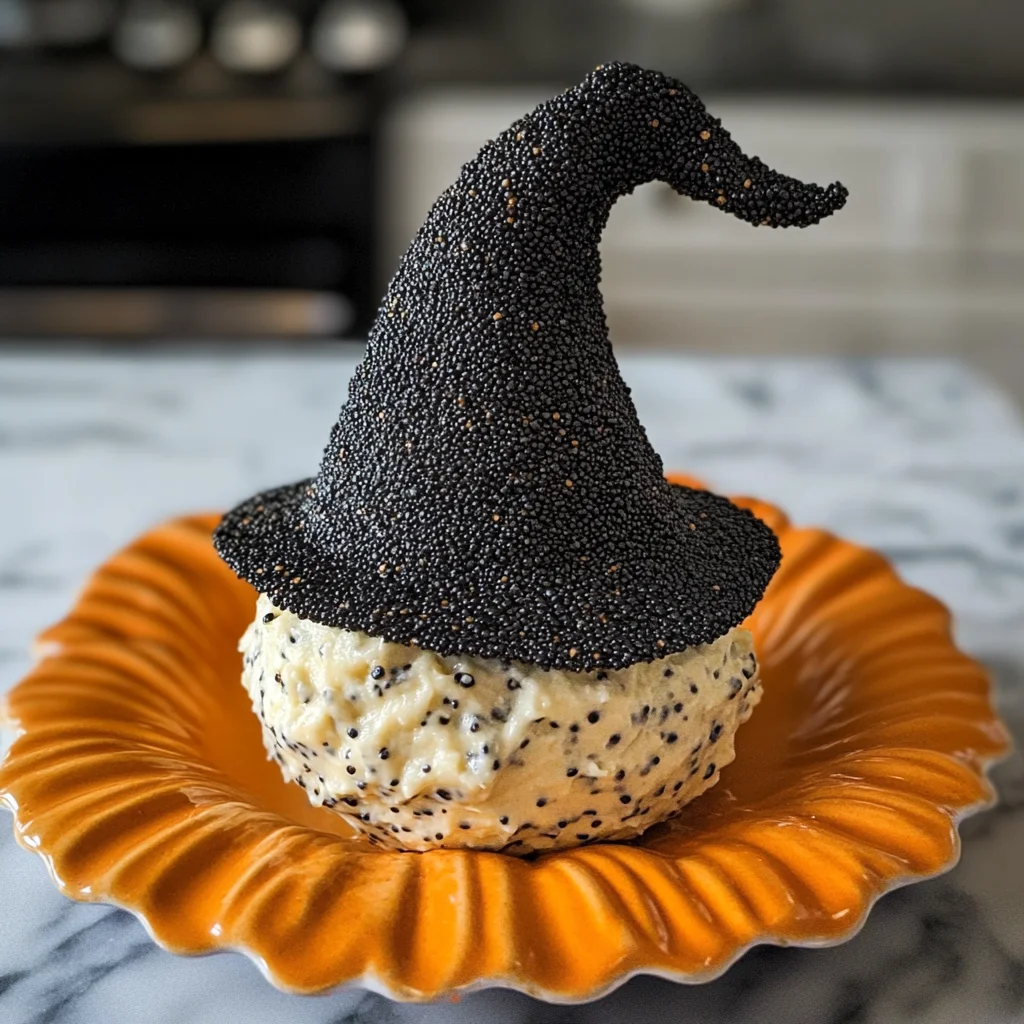
Witch Hat Halloween Cheese Ball
If you’re looking for a fun and festive treat to impress your friends this Halloween, the Witch Hat Halloween Cheese Ball is just the thing! This delightful cheese ball not only looks enchanting but is also super easy to whip up. It’s one of those recipes that brings a smile to everyone’s face at parties, family gatherings, or even cozy nights in. Plus, it’s a great conversation starter—everyone will want to know how you made such a clever dish!
What I love most about this recipe is that it combines simple ingredients into something whimsical and delicious. Whether you’re hosting a spooky soiree or just want to add some seasonal flair to your snack table, this cheese ball fits the bill perfectly!
Why You’ll Love This Recipe
- Easy to make: With just four main ingredients and a few simple steps, you’ll have this cheese ball ready in no time!
- Family-friendly: Kids will adore the fun shape and tasty flavor, making it perfect for family gatherings.
- Make-ahead convenience: You can prepare it days in advance, so it’s one less thing to worry about on party day.
- Versatile serving options: Pair it with crackers, pretzels, or veggies for a delightful spread that caters to everyone.
- Impressive presentation: The witch hat design makes your appetizer stand out and adds a touch of magic to any table.
Ingredients You’ll Need
Let’s take a look at the simple, wholesome ingredients that come together to make this bewitching cheese ball. You likely have most of these already in your pantry!
For the Cheese Ball
- 16 oz Cream Cheese (2 blocks at room temperature)
- 3 cups Sharp White Cheddar Cheese (shredded, room temperature)
- 1 oz Ranch Seasoning Mix
- 1 cup Poppy Seeds
Variations
One of the best things about the Witch Hat Halloween Cheese Ball is its flexibility! Feel free to switch things up based on what you have or what flavors you love.
- Add herbs: Mix in fresh herbs like chives or parsley for an extra pop of flavor.
- Include nuts: Fold in finely chopped nuts for added crunch and richness.
- Spice it up: Add some cayenne pepper or hot sauce if you like a little heat in your cheese ball.
- Use different cheeses: Experiment with other cheeses like goat cheese or pepper jack for unique flavor profiles.
How to Make Witch Hat Halloween Cheese Ball
Step 1: Prepare the Cheese Mixture
Start by letting your cream cheese and shredded sharp cheddar come to room temperature. This step is crucial as it helps them blend smoothly. In the bowl of a stand mixer fitted with a paddle attachment, combine the cream cheese, white cheddar cheese, and ranch seasoning mix. Mixing these guys together creates a creamy base that’s packed with flavor!
Step 2: Shape the Brim
Next, divide the cream cheese mixture into two portions—one-third and two-thirds. Take the smaller portion (one-third) and transfer it onto a sheet of plastic wrap. Form this into a flat disc; this will be your witch hat brim! If your mixture feels too soft and hard to shape, pop it in the freezer for about 30 minutes to firm up.
Step 3: Create the Hat
Now it’s time for the fun part! With the remaining two-thirds of the cream cheese mixture, mold it into a cone shape on top of your brim. This will create that classic witch hat silhouette. Cover everything with plastic wrap and refrigerate for at least 4 hours—or overnight if you can wait!
Step 4: Decorate & Serve
Once your cheese ball has set beautifully in the fridge, remove it from its wrapping. Now sprinkle poppy seeds all over its surface and gently press them down so they stick well. The seeds give it an appealing look and add an interesting texture when served! Pair it with crackers, pretzels, bread, or fresh veggies for dipping. Enjoy every magical bite!
Pro Tips for Making Witch Hat Halloween Cheese Ball
Creating a show-stopping Witch Hat Halloween Cheese Ball is easy with a few helpful hints!
- Use room temperature ingredients – This ensures that the cream cheese and cheddar blend smoothly, resulting in a creamy texture that holds together well.
- Chill before serving – Allowing the cheese ball to set in the refrigerator for at least 4 hours (or overnight) helps it hold its shape better and enhances the flavors.
- Experiment with seasonings – Feel free to add additional spices or herbs to the cheese mixture for a personalized touch! Chives, garlic powder, or even a pinch of cayenne can add extra flavor.
- Make ahead of time – This dish can be prepared several days in advance and stored covered. It’s perfect for reducing stress on party day!
- Involve the kids – Let children help shape the cheese ball and sprinkle poppy seeds; it makes for a fun Halloween activity!
How to Serve Witch Hat Halloween Cheese Ball
Presenting your Witch Hat Cheese Ball creatively can make it an even more delightful centerpiece at your Halloween gathering!
Garnishes
- Fresh herbs – Sprigs of parsley or basil not only add color but also provide a fresh contrast to the rich cheese flavors.
- Edible flowers – Brightly colored edible flowers like pansies can bring an enchanting touch, making your dish even more festive.
Side Dishes
- Crackers – A variety of crackers, including whole grain or flavored options, offer different textures and tastes that complement the cheese ball perfectly.
- Pretzels – Their salty crunch pairs wonderfully with the creamy cheese, adding another layer of flavor and texture.
- Vegetable platter – Crisp veggies like carrots, celery sticks, and bell pepper slices provide freshness and are great for scooping up the cheese ball.
- Breadsticks or baguette slices – These are perfect for dipping into the delicious cheese mixture, providing a satisfying chew alongside the rich flavors.
Now you’re all set to create an unforgettable Witch Hat Halloween Cheese Ball that will wow your guests! Enjoy this spooky season with laughter, good company, and delicious food. Happy Halloween!
Make Ahead and Storage
This Witch Hat Halloween Cheese Ball is perfect for meal prep! You can easily make it ahead of time, making entertaining a breeze during the spooky season.
Storing Leftovers
- Store leftover cheese ball in an airtight container in the refrigerator.
- It will keep well for up to 5 days.
- For best taste, allow it to come to room temperature before serving again.
Freezing
- While this cheese ball can be frozen, it’s best enjoyed fresh.
- If you must freeze, wrap tightly in plastic wrap and place in a freezer-safe bag.
- It can be frozen for up to 2 months, but texture may change slightly upon thawing.
Reheating
- There’s no need to reheat this dish; simply let it sit out at room temperature for about 30 minutes before serving.
- This allows the flavors to come alive and makes it easier to spread on your favorite crackers or veggies.
FAQs
Here are some common questions about the Witch Hat Halloween Cheese Ball.
Can I make the Witch Hat Halloween Cheese Ball ahead of time?
Absolutely! This cheese ball can be made several days in advance. Just follow the storage tips above for the best results.
What can I serve with the Witch Hat Halloween Cheese Ball?
This delightful cheese ball pairs wonderfully with a variety of dippers. Try serving it with crackers, pretzels, sliced bread, or fresh vegetables for a fun spread!
Can I use different cheeses in the Witch Hat Halloween Cheese Ball?
Yes! Feel free to experiment with different cheese combinations. Just ensure they are shredded and at room temperature for easy mixing.
How do I shape the Witch Hat Halloween Cheese Ball?
To achieve the iconic hat shape, form two portions of your cheese mixture into a flat disc and a cone. The flat disc serves as the brim while the cone forms the top of your hat!
Is this recipe suitable for kids?
Definitely! Kids will love both making and eating this festive cheese ball. It’s an engaging recipe that can involve them in decorating and choosing their favorite dippers!
Final Thoughts
I hope you enjoy creating this enchanting Witch Hat Halloween Cheese Ball for your next gathering! It’s not only simple but also impressively festive and delicious. Your family and friends will surely be delighted by its appearance and flavor. Happy cooking, and have a spooktacular celebration!
Witch Hat Halloween Cheese Ball
Get ready to wow your guests this Halloween with an irresistible Witch Hat Halloween Cheese Ball! This whimsical appetizer not only brings festive flair to your gathering but also offers a deliciously creamy taste that everyone will love. Made with simple ingredients, this cheese ball is incredibly easy to prepare and can be made ahead of time, making it a perfect addition to your party spread. The combination of sharp cheddar and ranch seasoning creates a flavorful base, while the poppy seeds add an enchanting touch that resembles a witch’s hat. Whether you’re hosting a spooky soirée or enjoying a cozy night in, this cheese ball is sure to be the highlight of your celebration!
- Prep Time: 20 minutes
- Cook Time: 0 minutes
- Total Time: 20 minutes
- Yield: Serves approximately 12 people (1 oz per serving) 1x
- Category: Appetizer
- Method: No-Cook
- Cuisine: American
Ingredients
- 16 oz Cream Cheese
- 3 cups Sharp White Cheddar Cheese
- 1 oz Ranch Seasoning Mix
- 1 cup Poppy Seeds
Instructions
- Allow cream cheese and shredded cheddar to come to room temperature.
- In a mixing bowl, combine cream cheese, cheddar, and ranch seasoning until smooth.
- Divide the mixture into two portions—one-third for the brim and two-thirds for the hat.
- Shape the smaller portion into a flat disc for the brim.
- Mold the larger portion into a cone shape on top of the disc.
- Refrigerate for at least 4 hours to set.
- Once chilled, coat with poppy seeds and serve with crackers or veggies.
Nutrition
- Serving Size: 1 oz
- Calories: 100
- Sugar: 1g
- Sodium: 210mg
- Fat: 8g
- Saturated Fat: 5g
- Unsaturated Fat: 3g
- Trans Fat: 0g
- Carbohydrates: 2g
- Fiber: 0g
- Protein: 5g
- Cholesterol: 30mg